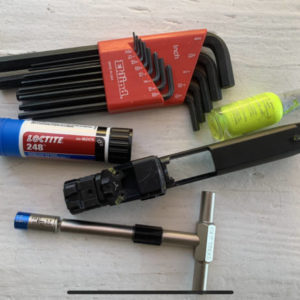
 To some degree, mounting any optic can involve a bit of voodoo and magic. It’d be humorous, except for mounting failures for red dots being widespread. Unfortunately, when they happen in class, there isn’t always time for the fix to take before a student is shooting again.
The following mounting method comes from the deputy sheriffs’ teaching at the Los Angeles County Sheriff’s Department’s Weapon Training Unit. They are regularly running both optics user and instructor classes, and in those programs, they see numerous combinations and share that information.
First, ensure that everything needed to mount the optic is present. This check includes mounting & sealing (if required) plates, screws, taller sights, etc.
Next, makes sure the optic is functional. They can, and do, come out of the box broken.
Now test fit everything without using thread lockers or torquing. Does the optic fit the plate? Does the plate fit the slide? Do the screws work with the threaded surfaces? Remove all of the possible failure points ahead of time.
“Now we’ll prep everything by degreasing all interacting surfaces. That means: the cut out in the slide;the threaded holes in the slide; the plate (if applicable) and any threaded holes in it; as well as the screws.
You can use acetone, gun scrubber, or other degreasing products, or what I often use isopropyl alcohol wipes.
Once dry, you’ll apply your thread locker. This is very important. Locktite 248 is recommended as it will go where needed without being excessive. The recommendation is to apply it with a finger while turning the screw. The goal is to have enough Locktite on the threads for the length of engagement in the hole without having any globs of it outside the threads.
Directly from them: “Then tighten each side until you feel a bit of resistance. Then alternate tightening until you reach the torque spec you need. I’ve recently started at about 75% – 80% of whatever the spec is and then increasing the torque on the wrench to get to the specified amount. I’m too dumb for the engineering aspects of it – but torsional forces dissipate over time, so taking a bit of time to ramp up to full torque seems like it may be a good thing. It may be voodoo. I don’t know. That said, after a couple conversations and playing with the idea I’m starting to feel like it helps avoid some issues I’ve had in the past where a given torque spec was not ok and stripped or sheared screws resulted. I’ve also heard that getting to that specific torque value, even if lower than the “spec”, helps to condition or calibrate or whatever the torque wrench, so the wrench is more accurate once at the given spec. That may be BS as well, so I welcome input there from people who know things.”
Once you have torqued everything to the specification, mark all of the screws with an oil-based paint pen (note: I have also used bright fingernail polish). Paint a clean line from the center of the screw head onto the adjacent service. To aid in identifying any movement, allow some to run into the space between them. This mark is not there to prevent movement; it lets you know visually if there has been any loosening of the screws.
If there has been loosening, repeat the above process with new screws.
This is the crucial part: Let it cure for at least 24 hours, not just overnight, before zeroing.
This process appears to be the “best practice” developed to date. Please let me know if you encounter issues with it.


